

Making a Graph Class in Python
- Jonathan

- Jun 25, 2023
- 9 min read
I've been working with graphs for a while, mostly using SageMath. Now I want to see how much of that functionality I can implement into Python myself!
To start at the basics, a graph G = (V,E) is a collection of vertices V and a collection of edges E between those vertices. Graphs pop up absolutely everywhere and a big part of their beauty comes from visualizing them. Here are some examples:


A current Python package to deal with graphs (also called networks) is NetworkX. This is really good!! Hagberg, Schult, and Swart explain in this paper that they began working on NetworkX in 2002 to study the spread of disease. Ok, let's start!
Starting the Graph Class
We'll take in a set of vertices "V" and a set of edges "E". One big difference between graphs and posets is that the edges of a graph have no direction. So we want the set of edges to be symmetric, meaning if (a,b) is in E, then (b,a) is in E. But typing both is annoying, so we'll allow the user to just enter whatever edges they want (as long as their endpoints are actually vertices), and then we'll make the set symmetric.
We'll also restrict to simple graphs, meaning we have no loops (a,a) and we don't allow multiple edges between the same vertices. To do this, we'll add a "list(set(L))" to each input list. "set(L)" will remove any multiples in "L", and then "list(set(L))" converts that back to a list.
class GraphClass():  #Simple Graphs

     def __init__(self,V = [],E = []):
          self.vertices = list(set(V))
          self.edges = list(set(E))
          for e in E:
               if e[0] not in V or e[1] not in V:
                    print("Edge has endpoints not in vertex set")
                    return
               if e[0] == e[1]:
                    print("Simple graphs don't allow loops")
                    return
               if (e[1],e[0]) not in E:  #Make Symmetric
                    self.edges.append((e[1],e[0]))
          self.size = len(self.edges)//2
          self.order = len(self.vertices)
We also initialized the size of the graph, which is the number of edges, and the order of the graph, which is the number of vertices. Next, let's add a method to add and remove vertices. When adding, we'll check if the label is already a vertex and add it if not. We also update "self.order" by adding one.
def add_vertex(self,v):
     if v not in self.vertices:
          self.vertices.append(v)
          self.order += 1
          return

     print(f'Vertex {v} already exists')
By the way, I'm trying out a different syntax from "if-else" and am using a return statement to end the function after adding the vertex if it doesn't already exist. Then the print statement will only run if the "if" statement is "False". So it's essentially the same!
Next, we'll add a method to remove vertices, which is essentially the same, but includes a loop to remove any edges with that vertex as an endpoint.
def remove_vertex(self,v):
     if v in self.vertices:
          self.vertices.remove(v)
          self.order -= 1
          deg = 0
          for e in self.edges:
               if e[0] == v or e[1] == v:
                    self.edges.remove(e)
                    deg += 1
          self.size -= deg//2
          return
      print(f'Vertex {v} not found')
Next, we want to be able to add and remove edges. When adding an edge, we'll check whether its endpoints are vertices, and if not, it will tell you which endpoints failed. If you try to add a loop, we'll reject it since we're working with simple graphs. Finally, we'll check if it's already an edge, and if it passes all those tests, then we'll add it (a,b) and its reverse (b,a) to the edge set! We'll also increase the size by one.
def add_edge(self,e):
     if e[0] not in self.vertices:
          if e[1] not in self.vertices:
               print('Neither vertex found')
               return
          print(f'Vertex {e[0]} not found')
          return
     if e[1] not in self.vertices:
         print(f'Vertex {e[1]} not found')
     if e[0] == e[1]:
         print('Simple graphs don\'t allow loops')
         return
     if e not in self.edges and (e[1],e[0]) not in self.edges:
         self.edges.append(e)
         self.edges.append((e[1],e[0]))
         self.size += 1
I'm fairly certain that the check for "e in self.edges" and "(e[1],e[0]) in self.edges" is redundant since we're always adding and removing edges in pairs. But I'll keep it to be safe. Now if we want to remove an edge, it's actually much easier, like adding a vertex was.
def remove_edge(self,e):
     if e in self.edges:
          self.edges.remove(e)
          self.edges.remove((e[1],e[0]))
          self.size -= 1
          return

     print(f'Edge {e} not found')
Great, now we can build graphs, adding and removing vertices and edges as we please! But like we said before, the beauty is visualizing them! So let's get that going before we continue.
Visualizing Graphs in Python
To get the graphical depiction of our graph, there are multiple directions we could go. Here are a few.
Matplotlib
NetworkX
Tkinter
Turtle
Pygame
And what we're going to go with is...PYGAME! The others have too much functionality already built in for this kind of thing, and I want to see how minimal I can make the dependencies of this class. So at the very top, we want to import pygame and initialize it and its font module. You know what, I'll just give you the basic template I always start off with.
import pygame
pygame.init()
pygame.font.init()


sw,sh = 800,800
screen = pygame.display.set_mode((sw,sh))
while True:
    event_list = pygame.event.get()
    for event in event_list:
        if event.type == pygame.QUIT:
            pygame.quit()


    pygame.display.flip()
Let's go through this real fast. The line "sw,sh = 800,800" are defining the screen width and height, then "screen = pygame.display.set_mode((sw,sh))" actually builds the display. The "while" loop is our Main Loop, and it will run until we give an explicit command to escape the loop. Inside this loop will be where we draw our graphs and check for user input in the form of clicks, movement, or key presses. The one event we add by default is if the user clicks the X, then we quit pygame. Then "pygame.display.flip()" shows us the screen!
Seeing what the user does is what "event_list" is for. It will generate a list of all events that just occurred, which we can then use to alter our display. But what is an event? A good way to test this is to type
while True:
    print(pygame.event.get())
and then do things and see how the event list changes. At the very beginning, we'll see a bunch of initial events pygame does:
AudioDeviceAdded, WindowShown, WindowHidden, WindowExposedOnce we start messing around with our mouse and keyboard, some events we see are:
MouseMotion, MouseButtonDown, MouseButtonUp, KeyUp, KeyDownWithin those, we get information about which buttons/keys are pressed, where the cursor is, where the cursor was, and which window we are on.
So here are a few goals I'll set for visualizing our graph:
Show vertices with a background color, border, and label.
Allow the user to click and drag vertices around.
Show edges and have them dynamically update with moved vertices.
Allow the user to add vertices within the GUI.
Allow the user to add edges within the GUI.
This will go within its own method in GraphClass, which we'll call "show()". We'll take in a "layout" parameter that will let us determine the vertex positions by plugging it into a separate function "create_v_pos". It defaults to a circular display, which we do by writing "layout = 'Circle'" as the parameter instead of just "layout". We also need to pass in the screen size and number of vertices to draw the layouts. This will either give us a list of positions or return "None" if the input is invalid.
In the "show()" method, we'll include a check for whether the length of the position list is right and return some error messages if not. Here is all that put together:
class GraphClass():
    ...

    def show(self,layout='Circle'):
        sw,sh = 800,800
        screen = pygame.display.set_mode((sw,sh))

        vert_pos = create_v_pos(layout,sw,sh,self.order)
        if vert_pos == None:
            print('Incorrect layout')
            return
        if len(vert_pos) > self.order:
            print("More vertex positions than vertices")
            return
        if len(vert_pos) < self.order:
            print("More vertices than vertex positions")
            return

        while True:
            ...
We'll get more detailed with the error message as we go. For now, let's write "create_v_pos(layout,screen_width,screen_height,order)" outside the class. If "layout" is a string, then we'll check for a list of predefined layouts (which are to be determined). If it is a list, we'll check that it contains 2-tuples and then set our vertex position list to that. If it fails anything, we'll have it return None.
def create_v_pos(layout,screen_width,screen_height,order):
     if type(layout) == list:
          for i in range(len(layout)):
               if type(layout[i]) != tuple:
                    return None
               if len(layout[i]) != 2:
                    return None
          return layout
Next, we'll add the default layout we mentioned, a circular layout. The points on a circle of radius R with center (a,b) are described using sine and cosine. If our angle from the positive x-axis is A, then our x value is a + RcosA and our y value is b + RsinA. Well, because our y-axis is flipped on the computer, we would write b - RsinA. So we get
def create_v_pos(layout,screen_width,screen_height,order):
     ...

     #cyclic
     if type(layout) == str:
          if layout == 'Circle':
               VP = []
               center = (screen_width,screen_height)
               cyclic_rad = min(screen_width/4,screen_height/4)
               for i in range(order):
                    VP.append((center[0]/2 +     cyclic_rad*math.cos(i*2*math.pi/order),
               center[1]/2 - cyclic_rad*math.sin(i*2*math.pi/order)))
Ok, let's get to actually seeing these graphs!
Drawing Movable Vertices in Pygame
The concept isn't hard. Each time we loop through our Main Loop, we'll draw the vertices using our list of vertex positions. Then we'll check if you've clicked on the screen, and if so, we'll check to see if you clicked on any of the vertices by calculating the distance between your mouse position and the vertex. If it's less than the vertex radius, we know a vertex has been clicked! This goes within our "event_list" loop.
So how do we move the vertex dynamically? If the previous check gives us a vertex that's been clicked, then we take the vertex that is supposed to be moving and flip a flag (aka a boolean variable "moving_vertex") that tells the computer to update that vertex's position in the "vert_pos" list with the mouse's current position. Clicking again will then stop movement.
moving_vertex = None
while True:
     event_list = pygame.event.get()
     for event in event_list:
          if event.type == pygame.QUIT:
               pygame.quit()
          if event.type == pygame.MOUSEBUTTONDOWN:
               if moving_vertex == None:
                    mpos = pygame.mouse.get_pos()
                    #update vertex position
                    for ind,v in enumerate(vert_pos):
                         if distance(mpos,v) < vrad:
                              moving_vertex = (ind,self.vertices[ind])
                              break
               else:
                    moving_vertex = None
Then drawing the edges between those vertex positions will also move the edges dynamically for free! Finally, we draw the edges first and then the vertices so we don't see any overlap.
#draw edges
for e in self.edges:
    v1,v2 = e
    ind1 = self.vertices.index(v1)
    ind2 = self.vertices.index(v2)
    pos1 = vert_pos[ind1]
    pos2 = vert_pos[ind2]
    pygame.draw.line(screen,(0,0,0),pos1,pos2,5)

#draw vertices
for i in range(self.order):
    pygame.draw.circle(screen,(83,128,190),vert_pos[i],vrad)
    pygame.draw.circle(screen,(95,0,8),vert_pos[i],vrad,4)
    label = font.render(f'{self.vertices[i]}',1,(95,0,8))
     screen.blit(label,(vert_pos[i][0] - label.get_width()/2,vert_pos[i][1] - label.get_height()/2))


if moving_vertex != None:
    vert_pos[moving_vertex[0]] = pygame.mouse.get_pos()
And you see at the end is the code for the vertex to follow your mouse.
One last thing before an example. If we try to X out of the screen, we get an error "pygame error: display Surface quit." because Pygame keeps trying to do things after quitting. To fix this, we'll import "sys" and call a "sys.exit()" after "pygame.quit()" and this will close the program completely as soon as we hit X.
Let's give all this a test!
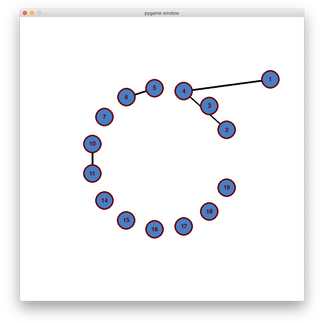
G = GraphClass([1,2,3,4,2,3,4,5,6,7,10,11,14,15,16,17,18,19],[(1,4),(5,6),(2,4),(10,11)])
G.show()
The first picture is what pops up and we see it has correctly removed repeat vertices. The next two pictures have vertices moved around by clicking on them. So everything looks good!


Great! We've accomplished goals 1,2,3 and will save 4,5 for the next post. The full code for what we've made so far is here:
import math
import pygame, sys

pygame.init()
pygame.font.init()
clock = pygame.time.Clock()

def distance(p1,p2):
     return math.sqrt((p1[0] - p2[0])**2 + (p1[1] - p2[1])**2)

def create_v_pos(layout,screen_width,screen_height,order):
     if type(layout) == list:
          for i in range(len(layout)):
               if type(layout[i]) != tuple:
                    return None
               if len(layout[i]) != 2:
                    return None
          return layout

     #cyclic
     if type(layout) == str:
          if layout == 'Circle':
               VP = []
               center = (screen_width//2,screen_height//2)
               cyclic_rad = min(screen_width/4,screen_height/4)
               for i in range(order):
                    VP.append((center[0] + cyclic_rad*math.cos(i*2*math.pi/order),center[1] - cyclic_rad*math.sin(i*2*math.pi/order)))
               return VP

     return

class GraphClass():  #Simple Graphs

     def __init__(self,V = [],E = []):
          self.vertices = list(set(V))
          self.edges = list(set(E))
          for e in E:
               if e[0] not in V or e[1] not in V:
                    print("Edge has endpoints not in vertex set")
                    return
               if e[0] == e[1]:
                    print("Simple graphs don't allow loops")
                    return
               if (e[1],e[0]) not in E:
                    self.edges.append((e[1],e[0]))
          self.size = len(self.edges)//2
          self.order = len(self.vertices)

     def add_vertex(self,v):
          if v not in self.vertices:
               self.vertices.append(v)
               self.order += 1
               return
          print(f'Vertex {v} already exists')

     def remove_vertex(self,v):
          if v in self.vertices:
               self.vertices.remove(v)
               self.order -= 1
               deg = 0
               for e in self.edges:
                    if e[0] == v or e[1] == v:
                         self.edges.remove(e)
                         deg += 1
               self.size -= deg//2
               return
          print(f'Vertex {v} not found')


     def add_edge(self,e):
          if e[0] not in self.vertices:
               if e[1] not in self.vertices:
                    print('Neither vertex found')
                    return
               print(f'Vertex {e[0]} not found')
               return
          if e[1] not in self.vertices:
               print(f'Vertex {e[1]} not found')
          if e[0] == e[1]:
               print('Simple graphs don\'t allow loops')
               return
          if e not in self.edges and (e[1],e[0]) not in self.edges:
               self.edges.append(e)
               self.edges.append((e[1],e[0]))
               self.size += 1

     def remove_edge(self,e):
          if e in self.edges:
               self.edges.remove(e)
               self.edges.remove((e[1],e[0]))
               self.size -= 1
               return

          print(f'Edge {e} not found')


     def show(self,layout = 'Circle'):
          #screen
          sw,sh = 800,800
          screen = pygame.display.set_mode((sw,sh))

          #vertex display
          vrad = min(min(sw/(2*self.order),sh/(2*self.order)),50)
          font = pygame.font.SysFont(None,int(vrad))
          vert_pos = create_v_pos(layout,sw,sh,self.order)

          if vert_pos == None:
               print('Incorrect layout')
               return
          if len(vert_pos) > self.order:
               print("More vertex positions than vertices")
               return
          if len(vert_pos) < self.order:
               print("More vertices than vertex positions")
               return

          moving_vertex = None
          while True:
               event_list = pygame.event.get()
               for event in event_list:
                    if event.type == pygame.QUIT:
                          pygame.quit()
                          sys.exit()
                    if event.type == pygame.MOUSEBUTTONDOWN:
                         if moving_vertex == None:
                              mpos = pygame.mouse.get_pos()
                              #update vertex position
                              for ind,v in enumerate(vert_pos):
                                   if distance(mpos,v) < vrad:
                                        moving_vertex = (ind,self.vertices[ind])
                                        break
                         else:
                              moving_vertex = None

               screen.fill((255,255,255))


               #draw edges
               for e in self.edges:
                    v1,v2 = e
                    ind1 = self.vertices.index(v1)
                    ind2 = self.vertices.index(v2)
                    pos1 = vert_pos[ind1]
                    pos2 = vert_pos[ind2]
                    pygame.draw.line(screen,(0,0,0),pos1,pos2,5)

               #draw vertices
               for i in range(self.order):
                    pygame.draw.circle(screen,(83,128,190),vert_pos[i],vrad)
                    pygame.draw.circle(screen,(95,0,8),vert_pos[i],vrad,4)
                    label = font.render(f'{self.vertices[i]}',1,(95,0,8))
                    screen.blit(label,(vert_pos[i][0] - label.get_width()/2,vert_pos[i][1] - label.get_height()/2))

               if moving_vertex != None:
                    vert_pos[moving_vertex[0]] = pygame.mouse.get_pos()

               clock.tick(60)
               pygame.display.flip()
I've tested it and copy-pasting the above into a .py file will allow the code to run correctly! Next time, I'll probably just post the .py file, since the document is getting so long...
Thank you for reading!
Jonathan M Gerhard


Comments