

Making a Graph Class in Python 2 - GUI
- Jonathan

- Jun 26, 2023
- 12 min read
In the last post, we built the basics of our graph class and added the ability to view our graph using Pygame. Check the bottom of that post for the full code up to this point! And check the bottom of this post for the python file and executable of today's work.
Now I want to add a GUI so that you can add vertices and edges just by clicking a button. But first, it'll be cool to have a few preset graphs that we can pull up with a keyword. For example, a Cycle Graph on n vertices is one that forms a single cycle, meaning all our edges look like (i, i + 1) for i = 0, 1, ..., n-2 and for the final edge, (n - 1, 0). We can do these together using the mod operator "%".
def CycleGraph(n):
     return GraphClass(list(range(n)),[(i,(i+1)%n) for i in range(n)])
And it works as hoped!
G = CycleGraph(7)
G.show()
Another common graph is the Complete Graph on n vertices, which has every edge possible.
def CompleteGraph(n):
     return GraphClass(list(range(n)),[(i,j) for i in range(n-1) for j in range(i+1,n)])

G = CompleteGraph(8)
G.show()
Here is the default layout, and then the same graph with vertices moved around by clicking.


Next, we'll add a couple of graphs that are near and dear to my heart.
The Rook's Graph of size N, M is a graph whose vertices are the squares of an NxM grid, with two vertices connected if they are in the same row or column.
The Shrikhande Graph is a graph on 16 vertices with 48 edges, whose importance I discussed way back when in an old blog post about 3d-printing!
It's good to note that a circular layout for any of this is not the natural layout I would choose. This is where we'd update the "create_v_pos" function to return the usual layouts for these graphs. But for now, let's just implement them and see them!
First, the Rook's Graph.
def RooksGraph(n,m):
     V = [(i,j) for i in range(n) for j in range(m)]
     E = [(v1,v2) for v1 in V for v2 in V if v1 != v2 and (v1[0] == v2[0] or v1[1] == v2[1])]
     return GraphClass(V,E)
And here are "RooksGraph(3,3)", "RooksGraph(2,4)", and "RooksGraph(2,3)".


This is a good example that labels of vertices can be more than just numbers! For the Shrikhande Graph, the vertices are also ordered pairs. They can be viewed as (a,b) for a,b between 0 and 3. Then we connect two vertices if their difference lies in the set [(0,1),(0,3),(1,0),(3,0),(1,1),(3,3)], taken mod 4.
def ShrikhandeGraph():
     V = [(i,j) for i in  range(4) for j in  range(4)]
     edge_condition = [(0,1),(0,3),(1,0),(3,0),(1,1),(3,3)]
     E = [(v1,v2) for v1 in V for v2 in V if ((v1[0] - v2[0])%4,(v1[1] - v2[1])%4) in edge_condition]
     return GraphClass(V,E)
Testing this...

This last graph demonstrates another way we could even define a graph. The vertices being elements of finite rings (for example, Z mod n and powers of such rings) and then connecting two vertices if performing some operation on them lies in some edge_condition set. A few examples of graphs like this are Paley Graphs (which are important to Ramsey Theory) and Kneser Graphs (which appear in lots of places).
We're going to do one more thing before we build the GUI we want.
Matrices from Graphs
A matrix (from a programming perspective) is a rectangular array of objects. To keep it simple here, those objects will be integers, so we can just picture a big grid of integers. We can define a few matrices that tell us about our graph and we'll go ahead and implement those into our class!
The first is the Adjacency Matrix, which has rows and columns indexed by vertices and we'll set spot (a,b) to 1 if (a,b) is an edge in our graph, and 0 if not. To represent this, we could either form a normal list of lists, or we could use NumPy, which is an incredible package in Python to work with matrices. To do this, we'll add "import numpy as np" to the top of our document. Their representation is nice but maybe you don't want it, so we'll give either option.
def adjacency_matrix(self,npa = False):
          am = []
          for v in self.vertices:
               row = []
               for w in self.vertices:
                    row.append(int((v,w) in self.edges))
               am.append(row)
          if npa:
               return np.array(am)
          return am
Note that "npa" stands for "NumPy Array", so by default we'll return a list of lists and if you want, we'll return the numpy array.
G = CompleteGraph(5)
print(G.adjacency_matrix())
#output: [[0, 1, 1, 1, 1], [1, 0, 1, 1, 1], [1, 1, 0, 1, 1], [1, 1, 1, 0, 1], [1, 1, 1, 1, 0]]
print(G.adjacency_matrix(True))
#output:
[[0 1 1 1 1]
 [1 0 1 1 1]
 [1 1 0 1 1]
 [1 1 1 0 1]
 [1 1 1 1 0]]
And another test with the Rook's Graph.
G = RooksGraph(3,3)
print(G.adjacency_matrix())
#output:
[[0, 0, 1, 1, 1, 0, 1, 0, 0], [0, 0, 0, 0, 1, 0, 1, 1, 1], [1, 0, 0, 0, 1, 1, 0, 1, 0], [1, 0, 0, 0, 0, 1, 1, 0, 1], [1, 1, 1, 0, 0, 0, 0, 0, 1], [0, 0, 1, 1, 0, 0, 0, 1, 1], [1, 1, 0, 1, 0, 0, 0, 1, 0], [0, 1, 1, 0, 0, 1, 1, 0, 0], [0, 1, 0, 1, 1, 1, 0, 0, 0]]
print(G.adjacency_matrix(True))
#output:
[[0 0 1 1 1 0 1 0 0]
 [0 0 0 0 1 0 1 1 1]
 [1 0 0 0 1 1 0 1 0]
 [1 0 0 0 0 1 1 0 1]
 [1 1 1 0 0 0 0 0 1]
 [0 0 1 1 0 0 0 1 1]
 [1 1 0 1 0 0 0 1 0]
 [0 1 1 0 0 1 1 0 0]
 [0 1 0 1 1 1 0 0 0]]
We have two other matrices we'll add. The Incidence Matrix has rows indexed by vertices and columns indexed by edges. The spot (v,e) has a 1 in it if one of the endpoints of e is v, and 0 otherwise. The Laplacian Matrix is the negative of the Adjacency Matrix, plus we add the degree of each vertex along the diagonal. Here they are in Python:
def incidence_matrix(self,npa = False):
          im = []
          reduced_edges = []
          for e in self.edges:
               if (e[1],e[0]) not in reduced_edges:
                    reduced_edges.append(e)
          for v in self.vertices:
               row = []
               for e in reduced_edges:
                    if e[0] == v or e[1] == v:
                         row.append(1)
                    else:
                         row.append(0)
               im.append(row)
          if npa:
               return np.array(im)
          return im


def laplacian_matrix(self,npa = False):
     A = self.adjacency_matrix()
     L = []
     for i in range(self.order):
          row = []
          for j in range(self.order):
               if i == j:
                    row.append(sum(A[i]))
               else:
                    row.append(-A[i][j])
          L.append(row)
     if npa:
          return np.array(L)
     return L
And here's a test with the cycle graph.
G = CycleGraph(5)
print(G.adjacency_matrix(True))
#output:
[[0 1 0 0 1]
 [1 0 1 0 0]
 [0 1 0 1 0]
 [0 0 1 0 1]
 [1 0 0 1 0]]
print(G.incidence_matrix(True))
#output:
[[1 1 0 0 0]
 [1 0 1 0 0]
 [0 0 1 0 1]
 [0 0 0 1 1]
 [0 1 0 1 0]]
print(G.laplacian_matrix(True))
#output:
[[ 2 -1  0  0 -1]
 [-1  2 -1  0  0]
 [ 0 -1  2 -1  0]
 [ 0  0 -1  2 -1]
 [-1  0  0 -1  2]]
Great! We'll do more with that later, but for now, let's build our GUI!
Building a Graph GUI in Pygame
We're now back inside the "show(self,layout='Circle')" method inside GraphClass. To not mess with our previous work in layout positioning, we'll add a "gui_height" variable and extend the screen display. We'll also shrink the screen width and height a bit to allow for this extra space. So now it looks like:
def show(self,layout = 'Circle'):
          #screen
          sw,sh = 700,700
          gui_height = sh//5
          screen = pygame.display.set_mode((sw,sh+gui_height))
We'll draw a line at "y = sh" by writing "pygame.draw.line(screen,(0,0,0),(0,sh),(sw,sh),5)". And I think it looks like a good amount of space!

Next, we'll adjust the movement of our vertices to stop at that line instead of allowing us to move them anywhere. All we do is adjust the line near the bottom of our Main Loop:
if moving_vertex != None:
    mpos = pygame.mouse.get_pos()
    vert_pos[moving_vertex[0]] = (mpos[0],min(mpos[1],sh))
To add buttons to our GUI, we're going to define a Button_Object class. We will take into account its
position,
size,
background color and border color (when inactive and hovered),
label,
the margin between the label and the edge of the button box,
the function to perform when the button is clicked.
This essentially comes down to a lot of initial variable declarations, then a method to draw the button, and finally a method to update the button based on whether it's active (hovered over) or if it's been clicked.
#Button Class
class Button_Object():
     def __init__(self,x,y,button_text,font,text_colors,bg_colors,bord_color,margin,button_function,*args):
          self.active = False
          ref_surf = font.render(button_text,1,(0,0,0))
          self.rect = pygame.Rect(x,y,ref_surf.get_width()+margin,ref_surf.get_height()+margin)
          self.button_text = button_text
          self.font = font
          self.text_colors = text_colors
          self.bg_colors = bg_colors   #if bg_color = None, then bg is transparent
          self.margin = margin
          self.text_colors = text_colors
          self.bg_colors = bg_colors
          self.bord_color = bord_color
          self.button_function = button_function

     def draw(self,surf):
          text = self.font.render(self.button_text,1,self.text_colors[self.active])
          if self.bg_colors == None:
               pass
          else:
               pygame.draw.rect(surf,self.bg_colors[self.active],self.rect)
               pygame.draw.rect(surf,self.bord_color,self.rect,3)
          surf.blit(text,text.get_rect(center = self.rect.center))

     def update(self,event_list):
          mpos = pygame.mouse.get_pos()
          self.active = self.rect.collidepoint(mpos)
          for event in event_list:
               if self.active and event.type == pygame.MOUSEBUTTONDOWN:
                    self.button_function()
A few comments: In the draw function, we include "if self.bg_colors == None: pass" so that the background can transparent if you want. In the update function, we use pygame's built-in method "Rect.collidepoint(point)", which checks if the point intersects with the given rectangle. Then if we click on the button, we do "button_function()".
The first thing we want to add is an 'Add Vertex' button. But how do we do this, considering the vertex labels can be essentially anything? Plus, the button function doesn't take any arguments by default. So we'll define an intermediate function that pops up a prompt box asking for the user to input a label. Then we'll have that function call the "self.add_vertex" method with the given label.
This is a bit more involved, so let's take it piece by piece. We'll define another class called "Typed_User_Input" and initiate the position, size, font, and input string. The box will grow with more text, so we'll set a minimum width "min_w".
class User_Typed_Input():
     def __init__(self,x,y,w,font,margin):
          self.active = False
          self.font = font
          self.input_str = ''
          self.text = font.render(self.input_str,1,(0,0,0))
          self.min_w = min_w
          self.input_box = pygame.Surface([min_w,self.text.get_height()+margin])
          self.input_box_rect = self.input_box.get_rect(topleft = (x,y))
Adding a "draw" method, we'll make the box white when inactive and gray when active. We'll draw the input box and also place the input_str inside the box using "blit".
def draw(self,surf):
          if self.active:
               self.input_box.fill((150,150,150))
          else:
               self.input_box.fill((255,255,255))
          self.input_box.blit(self.text,(2,5))
          surf.blit(self.input_box,self.input_box_rect)
          pygame.draw.rect(surf,(0,0,0),self.input_box_rect,5)
Finally, we add the update method. Clicking on the box will activate our user input box, and clicking RETURN will deactivate it.
def update(self,event_list):
          for event in event_list:
               if event.type == pygame.MOUSEBUTTONDOWN:
                    mpos = pygame.mouse.get_pos()
                    if self.input_box_rect.collidepoint(mpos):
                         self.active = True


               if self.active:
                    if event.type == pygame.KEYDOWN:
                         if event.key == pygame.K_RETURN:
                              self.active = False
Now here's the hardest part: How do we detect what the user types? Within the last loop looking at "KEYDOWN" events, if we print "event.key", we can see how each letter is encoded. Here are a few examples:
w <-> 119
d <-> 100
g <-> 103
delete <-> 8
shift <-> 1073742049
So, for example, JMathG would be interpreted as:
1073742049, 106, 1073742049, 109, 97, 116, 104, 1073742049, 103
The key is the number encoding the input, but how do we get back to the actual input? If we just print "event" instead of its key, we see it contains a good bit of information. Typing "A" for example is two events "shift+a", which look like this:
<Event(768-KeyDown {'unicode': '', 'key': 1073742049, 'mod': 1, 'scancode': 225, 'window': None})>

<Event(768-KeyDown {'unicode': 'A', 'key': 97, 'mod': 1, 'scancode': 4, 'window': None})>
This tells us what we need. We shouldn't look at "event.key" - we need to use "event.unicode" and that will give us what is typed!
Then we just detect which key is clicked and add "event.unicode" to "self.input_str". If the key is delete ("pygame.K_BACKSPACE"), then we delete the last character with slicing: "self.input_str = self.input_str[:-1]". Then we render the text and show it on the screen.
if self.active:
                    if event.type == pygame.KEYDOWN:
                         print(event)
                         if event.key == pygame.K_RETURN:
                              self.active = False
                         elif event.key == pygame.K_BACKSPACE:
                              self.input_str = self.input_str[:-1]
                              self.text = self.font.render(self.input_str,1,(0,0,0))
                         else:
                              self.input_str += event.unicode
                              self.text = self.font.render(self.input_str,1,(0,0,0))

                    self.input_box_rect.w = max(self.min_w,self.text.get_width() + self.margin)
                    self.input_box = pygame.transform.scale(self.input_box,(self.input_box_rect.w,self.input_box.get_height()))
The two lines at the bottom adjust the size of the input box to fit the typed text. This can be as big as you want, and we won't change that, but in an actual application with security concerns, you'd want to not only restrict the size of the user input but also would want to sanitize the input to prevent any type of code injection. Let's see how it looks!


Ok, now that we have a Button_Object class and a User_Typed_Input class, we want to connect those to let us add vertices. This is deserving of its own section...
Adding Vertices from the GUI
So those above classes are good for general use anywhere. But for this task, we'll make a few adjustments. The idea is that clicking the button will send a signal to show the vertex label prompt and tapping RETURN (or ENTER) calls the add_vertex function with that label. The details are a bit rougher and this is certainly not going to be perfectly efficient code. But I do what I can!
First, inside the Button_Object class, we remove the "button_function" parameter and just tell it to return a "1" if the button is clicked.
def update(self,event_list):
mpos = pygame.mouse.get_pos()
self.active = self.rect.collidepoint(mpos)
for event in event_list:
if self.active and event.type == pygame.MOUSEBUTTONDOWN:
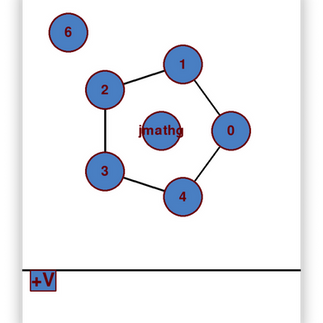
return 1Now inside the GraphClass, under the "show" method but before the Main Loop, we create the button ("+V") to add a vertex, called "VButton". We also create the User_Typed_Input object called "VPrompt" and set a flag "show_vertex_prompt = False".
def show(self,layout = 'Circle'):
    ....

    btext1 = '+V'
    show_vertex_prompt = False
    VPrompt = User_Typed_Input(sw//2 - 50,sh//2-gui_height//4,100,bfont,10)
    VButton = Button_Object(20,sh,btext1,bfont,text_colors,bg_colors,bord_color,margin)
Here is another large adjustment we'll make. In most of the GraphClass methods, we use a return statement to terminate the function, but left blank. This returns "None". But it would also return "None" if we just didn't do anything. So to make use of the success/failure of adding a vertex or edge, we'll change that to "return 0" if it fails. So a few updated sections are:
if vert_pos == None:
               print('Incorrect layout')
               return 0
          if len(vert_pos) > self.order:
               print("More vertex positions than vertices")
               return 0
          if len(vert_pos) < self.order:
               print("More vertices than vertex positions")
               return 0
def add_vertex(self,v):
if v not in self.vertices:
self.vertices.append(v)
self.order += 1
return
print(f'Vertex {v} already exists')
return 0def __init__(self,V = [],E = []):
self.vertices = list(set(V))
self.edges = list(set(E))
for e in E:
if e[0] not in V or e[1] not in V:
print("Edge has endpoints not in vertex set")
return 0
if e[0] == e[1]:
print("Simple graphs don't allow loops")
return 0
if (e[1],e[0]) not in E:
self.edges.append((e[1],e[0]))Now we go to into the Main Loop of the "show" method in GraphClass and add a GUI section. We draw the horizontal line, draw the button, and call the update method, setting its output to "Bool". This means "Bool = None" almost always, but as soon as we click the button, we'll send out a "Bool = 1" and then immediately go back to "Bool = None". So when we receive the "Bool = 1" flag, we set "show_vertex_prompt = True".
#GUI
pygame.draw.line(screen,(0,0,0),(0,sh),(sw,sh),5)
VButton.draw(screen)
Bool = VButton.update(event_list)
if Bool == 1:
    show_vertex_prompt = True
Once "show_vertex_prompt = True", we draw the prompt and update it with each loop.
if show_vertex_prompt:
    VPrompt.draw(screen)
    VPrompt.update(event_list)
Now we go back to User_Typed_Input and change 'self.active = False' to "True", because we want the user to be able to input text as soon as you click the button. And we use that to enter our next block of code. As soon as the user hits RETURN, it sets "VPrompt.active = False" and now we want to create a vertex with that label.
Here's the funky thing: If the user typed "1", then we'd expect them to want that to be an int. If we typed (1,2), then we'd want it to be a tuple. But currently all of these are strings. So the check for repeat vertices fails. To fix this, we import ast and use its function "literal_eval". It takes in a Python string and returns the type that the input actually represents. From the documentation, "ast.literal_eval" does:
Evaluate an expression node or a string containing only a Python literal or container display. The string or node provided may only consist of the following Python literal structures: strings, bytes, numbers, tuples, lists, dicts, sets, booleans, None and Ellipsis.
This does return an error in a lot of cases, however, so we will use a "try-except" statement. We will "try:" to add the vertex "ast.literal_eval(VPrompt.input_str)", but if that throws an error, then we execute "except:" which directly adds the vertex "VPrompt.input_str".
We'll set the "add_vertex" equal to a variable "ABool", which will be equal to 0 if adding that vertex failed. In the case that "ABool != 0", we add the center position to our vertex position list "vert_pos", set the prompt back to active, reset the prompt string to empty, render that empty string again, and finally set "show_vertex_prompt = False" again.
if VPrompt.active == False:
     try:
          addBool = self.add_vertex(ast.literal_eval(VPrompt.input_str))
     except:
          addBool = self.add_vertex(VPrompt.input_str)
     if addBool != 0:
          vert_pos.append((sw//2,sh//2))
     VPrompt.active = True
     VPrompt.input_str = ''
     VPrompt.text = VPrompt.font.render(VPrompt.input_str,1,(0,0,0))
          show_vertex_prompt = False
Awesome, let's see it work!


And in the case where we enter a vertex that already exists, it does nothing and prints our error message to the console:


Vertex 1 already existsThat was a lot! I think that's a good stopping point for this post. Next time, we'll add a button to print the graph vertex/edge info and then work on removing vertices and adding/removing edges from the GUI.
Because we have almost 300 lines of code now, I'll just put the link to the code here. I can't include the ".py" file, so here is a zip folder containing that file! If you have trouble unzipping it (on my Mac, it seemed to loop from .zip to .zip.cpgz for whatever reason?), this website has ways to solve the issue: https://osxdaily.com/2013/02/13/open-zip-cpgz-file/
Alternatively, if you don't even have Python but want to try out the program, this folder contains a EXE called GraphClass that should run the program when clicked on! There is a lot of other stuff in there as well, but don't get bogged down, it's all added by Pyinstaller to make the EXE work. Typing "G" will take you straight to where the correct executable is.
Thank you for reading!
Jonathan M Gerhard


Comments