

Image Processing Algorithms with OpenCV 2
- Jonathan

- Jul 1, 2023
- 7 min read
Updated: Jul 2, 2023
Check out the last post if you haven't already, since it sets up the framework for this post. I want to start off by writing a few easy functions. The first is to reflect the image. We'll do the same thing we've been doing. Make a reference image, go through each pixel of our image, then just flip the correct index based on whether we want to do a horizontal or vertical flip.
def flip(image,direction):
ref_img = image
r,c,_ = image.shape
for i in range(r):
for j in range(c):
print(ref_img == image)
if direction == 'hor':
image[i,j] = ref_img[i,c - 1 - j]
if direction == 'ver':
image[i,j] = ref_img[r - 1 - i,j]
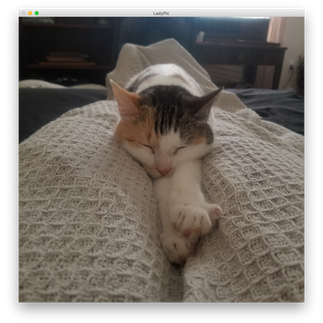
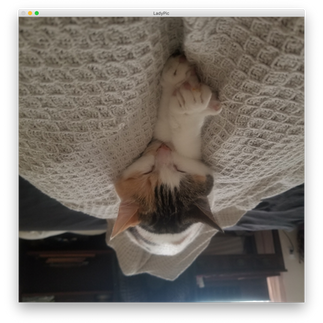
return imagePutting in LadyPic, what do we get?


Ok, not quite what we expected! But this is a good thing, because it reveals a MASSIVE mistake we've made through the last couple of posts. We wrote "ref_img = image" to make a reference image, but in doing so, we forgot a basic dichotomy of Python: Mutable vs Immutable Objects. An object is immutable if we can change it without altering any copies and mutable if changing any copy changes all the copies.
Immutable vs Mutable Objects in Python
As the documentation says,
Assignment statements in Python do not copy objects, they create bindings between a target and an object.
Here are a few examples of mutable and immutable types in Python:
Mutable: list, dict, set, NUMPY ARRAYS
Immutable: int, float, tuple, bool
As the emphasis shows, NumPy arrays are in fact mutable objects, so when we "made our reference image", all we really did was create another variable that points to that same original object. As we changed "image", we were in fact also changing "ref_img", which is why our "flip" image turned out the way it did.
A variable assignment in Python is a pointer to a memory location where that object is stored. So when we use the variable, Python goes to that location to pick it up. If our object is immutable, then changing one copy will actually result in Python creating a new object. If our object is mutable, then changing one copy changes the actual object at that location, so everything that points to that location is also changed. Let's see two examples. We'll visualize the creation of new objects by using "id", which gives the memory location of that object.
#Mutable Objects
A = [1,2]
B = A
print(id(A)) #output: 4682127104
print(id(B)) #output: 4682127104
A[1] = 3
print(B) #output: [1, 3]
print(id(A)) #output: 4682127104
print(id(B)) #output: 4682127104
So even though we didn't explicitly change "B", changing "A" also changed "B" because lists are mutable. We see both "A" and "B" reference memory location 4682127104.
#Immutable Objects
A = (1,2,3)
B = A
A[0] = 2
Traceback (most recent call last):
  File "<pyshell#7>", line 1, in <module>
    A[0] = 2
TypeError: 'tuple' object does not support item assignment
Even trying to alter an entry of an immutable object throws an error. But let's do the same test as above with "id" with immutable objects.
#Immutable Objects
A = 5.5
B = A
print(id(A)) #output: 4686703664
print(id(B)) #output: 4686703664
A = 7
print(B) #output: 5.5
print(id(A)) #output: 4527122928
print(id(B)) #output: 4686703664
So we set "B = A" and they both point to the same memory location 4686703664. Once we change "A", "B" remains unchanged, because Python changed where "A" points, 4527122928, while "B" still points at 4686703664.
The functions in this post that are affected are
blur, color_by_count, gradient, color_by_col_segments
And the only function in this post that is affected is "pixelate".
But not to worry! The fix is easy, we use Python's "copy" functionality. We replace all instances of "ref_img = image" with "ref_img = image.copy()". This will create a distinct copy of the mutable object at its own memory location, which we can check again with "id"s.
Testing this out with "flip", we get success!


By the way, OpenCV literally has a flip function built in, "cv2.flip", but it's always a good learning opportunity to make it ourselves!
We can also make a "scroll" function which will scroll the image horizontally or vertically a given distance, looping it around. We accomplish this very easily with the mod operator %.
def scroll(image,distance,direction):
     ref_img = image.copy()
     r,c,_ = image.shape
     for i in range(r):
          for j in range(c):
               if direction == 'hor':
                    image[i,j] = ref_img[i,(j - distance)%c]
               if direction == 'ver':
                    image[i,j] = ref_img[(i - distance)%r,j]
     return image
Here is a horizontal scroll by 500 and a vertical scroll by -1000.


Palette-Simplifying an Image
What I want to do next is a process function I'll call "Palette-Simplifying" an image. Imagine you want to paint an image you have but you only have a small palette of paint colors. To make it work, you can go through each pixel of the image and find the color on your palette which closest to that pixel's color. Then you can paint the image in a somewhat simplified way. And this is of course ignoring any actual painting techniques like blending colors.
Let's start our document with our usual imports, os, cv2, numpy. Then our first function will be "colorSimplify" (to switch it up, I'll use camelCase for this post, which goes against PEP8! Ah!). It will take in an image and a palette. Then it will run through each pixel of our image, find the palette color that most closely matches it, and replace it with that color.
def paletteSimplify(image,palette):
     #get_image
     PATH = os.getcwd()+f'/{image}'
     img = cv2.imread(PATH)
     r,c,_ = img.shape
     image_name = image.strip('.jpg')

     #processing
     for i in range(r):
          for j in range(c):
               img[i,j] = bestMatch(img[i,j],palette)

     #display
     cv2.imshow(image_name,img)
     cv2.waitKey(0)
     cv2.destroyAllWindows()
This is the same general format as the last few posts. Keep the image in the same folder as the python file and the #get_image will load the image in as a NumPy array, the #processing will do whatever we want, and the #display shows the image until we click any key. Now we need to define that "bestMatch(pixel,palette)" function. How do we determine which color in the palette is closest to the given pixel color?
Well, our color is given as (B,G,R) because that's OpenCV's default, and we can interpret this as a point in 3-space. This is called a color cube. That link lets you interact with a color cube to understand it better. Here is a picture from wikipedia:

The closer the colors are in position, the closer they are in color, which is pretty cool. And in this case extremely helpful, because it means "bestMatch" is essentially just the distance formula. We just choose a large enough initial distance so that the first palette color is always closer, and then we refine that best color.
def bestMatch(pixel,palette):
     best = None
     d = 3*(255**2) + 1
     for color in palette:
          new_d = (color[0] - pixel[0])**2 + (color[1] - pixel[1])**2 + (color[2] - pixel[2])**2
          if new_d < d:
               best = color
               d = new_d
     return best
Ok, let's test this! For our color palette, we'll use Bob Ross' trusty 13-color palette. Remember that this is written in (B,G,R) because OpenCV is old-school.
BobRoss = [(16, 52, 10), (0, 21, 78), (21, 27, 34), (31, 46, 95), (0, 0, 0), (68, 30, 2), (64, 0, 12), (60, 46, 16), (0, 236, 255), (0, 155, 199), (0, 184, 255), (0, 0, 219), (255, 255, 255)]For our image, let's use Starry Night by van Gogh. Here's the original and the simplified.


I'll also say that in terms of file size, this cuts it from 7.6MB to 4.1MB. Throughout, I'll add little annotations for how the file size changes with the simplification. Let's see what it looks like for a more colorful image. We'll craft up an image in Krita and apply the simplification.


(460KB --> 208KB)
Pretty interesting! But Bob Ross knew how to blend his paint colors, which we just don't have. Let's switch to another palette which I'll call the "Base8" palette,
Base8 = [(0,0,0),(255,0,0),(0,255,0),(0,0,255),(255,255,0),(255,0,255),(0,255,255),(255,255,255)]Here's what we get applying this to Smeared240:

(460KB --> 222KB)
Very cool! It basically cleared out all the smudge and opacity and made everything a very solid, vibrant version of itself. Consider this image on the left that's had Gaussian Blur applied to it. If we apply the simplify with base8, we get the image on the right.


(724KB --> 236KB)
Much more vibrant! What if we simplified the original image?


(1100KB --> 322KB)
We definitely get a more detailed but still vibrant image. Here's another idea. If our palette consists of shades of a single color, then our simplification ends up picking up how much of that specific color is in each pixel. Let's see a few examples. We'll define three palettes "BP", "GP", and "RP", consisting of 32 shades of that single color.
BP = [(i*8,0,0) for i in range(32)]
GP = [(0,i*8,0) for i in range(32)]
RP = [(0,0,i*8) for i in range(32)]
Now let's run our simplification on the previous image with each of these as our palettes.


(1100KB --> 685KB)
So what happens is that we are measuring how much of a given color a pixel has. The spots that are brightest have the most of that color, while the darker parts have less. This is why the blue part is especially bright in the BP palette, but yellow, green, and red are dark. In the GP palette, the green and yellow are bright but the red and blue are dark. And in the RP palette, the yellow and red are bright but the other colors are darker.
We can directly isolate the darkness by defining a brightness palette:
BrightP = [(8*i, 8*i, 8*i) for i in range(32)]
(1100KB --> 550KB)
If we use just a binary palette like [(0,0,0), (255,255,255)], then we exactly get the darkness_cutoff function that we defined last post! On the left is the palette-simplification while the right is the darkness_cutoff function we defined in the last post with darkness cutoff 384.


(1100KB --> 240KB)
This is because if a pixel falls below the central cutoff of 384, it'll be closer to (0,0,0), and if it's above, then it'll be closer to (255,255,255). Two totally different methods to get the same result - awesome! So we can generalize the darkness_cutoff function by adding colors to this palette. For example, adding (128,128,128) gives:

(1100KB --> 250KB)
Which makes sense as most pixels will be closer to the center. We could also put it into a "TBase" palette consisting of the three base colors (255,0,0), (0,255,0), (0,0,255).


(1100KB --> 228KB)
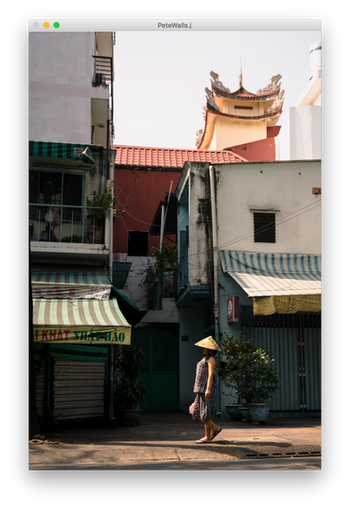
Here are two more examples of this with a picture from Pete Walls and a nice wallpaper.
(3300KB --> 980KB)


(1700KB --> 520KB)
I really like how these TBase palette-simplifications look! In the next post, we're going expand this idea of palette-simplification by sampling colors from the image to produce a palette close to the original image's colors, and then simplifying. Then we'll use that to do something a little more fun with our images. Next time!
Thank you for reading!
Jonathan M Gerhard


Comments