

Interactive Voronoi Diagram Maker in Pygame
- Jonathan

- Jul 5, 2023
- 6 min read
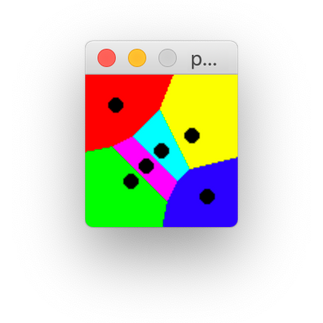
In this post, we wrote an algorithm to generate Voronoi Diagrams in Pygame (in Python). If we start with some background set and choose a set of defining points, then we can color the background set based on which defining point we're closest to. Each defining point then defines a Voronoi Cell in the Diagram. We visualized this in 2 dimensions with Pygame:


What I want to do in this post is to turn this into an interactive display, meaning that you can add defining points and see the changes live. The function to compute Voronoi Cells is as simple as translating the description we gave above to code. We first import the Pygame, sys, and math modules. We also define a distance function to use in the Voronoi Algorithm.
def distance(A,B):
     return ((A[0] - B[0])**2 + (A[1] - B[1])**2)**(1/2)
And then we define the Voronoi algorithm for any background set and defining set
def Voronoi(bg_set,def_set):
     VoronoiCells = {defpt: [] for defpt in def_set}
     for pt in bg_set:
          best = 0
          best_d = distance(pt,def_set[0])
          for i, defpt in enumerate(def_set):
               new_d = distance(pt,defpt)
               if new_d < best_d:
                    best = i
                    best_d = new_d
          VoronoiCells[def_set[best]].append(pt)
     return VoronoiCells
We store the cells as a dictionary where each defining point is a key and the value of a specific key is the set of background points closest to that point. So each "key-value" pair in our dictionary is a Voronoi cell. Notice that we don't even have to have the set of defining points be a subset of the background set.
For this post, however, the background set will always be the whole 2D screen. I want to be able to make the screen resizable instead of a static size, and this is as simple as adding a "pygame.RESIZABLE" when we define our screen. We also add a window name with "pygame.display.set_caption".
Inside the Event Loop, we check for resizing, which is a VIDEORESIZE event in Pygame, so that we can redefine our variables "sw,sh" to match the window's width and height after resizing.
def main():
     sw,sh = 500,500
     screen = pygame.display.set_mode((sw,sh),pygame.RESIZABLE)
     pygame.display.set_caption('Interactive Voronoi')

     while True:
          event_list = pygame.event.get()
          for event in event_list:
               if event.type == pygame.QUIT:
                    pygame.quit()
                    sys.exit()
               if event.type == pygame.VIDEORESIZE:
                    sw,sh = screen.get_size()

          pygame.display.flip()
Running this gives us a blank screen, but we can resize it, so it's a success! Next, let's add the ability to click on a spot of our screen to add a point to our defining set. We'll also make pressing "c" empty the defining set.
def_set = []
while True:
    ...
        ...
        if event.type == pygame.MOUSEBUTTONDOWN:
            def_set.append(pygame.mouse.get_pos())
        if event.type == pygame.KEYDOWN:
             if event.key == pygame.K_c:
                 def_set = []
Ok, printing "def_set" at the end of our Main Loop shows this works. But let's visualize it by actually drawing something to the screen. We'll fill the screen with white and we'll add a loop through "def_set" and draw a black circle at each point.
while True:
    ...

    screen.fill((255,255,255))
    for defpt in def_set:
        pygame.draw.circle(screen,(0,0,0),defpt,3)

    pygame.display.flip()
Now as we change "def_set" with the Event Loop, our Main Loop with draw those updates automatically. And you can test this now and click around the screen to add black dots, and press "c" to clear the screen. Note that if we resize the window, the set "def_set" doesn't actually change, so our points will stay in the same spot.
Now to actually get the Voronoi cells, we'll go outside our Main Loop and initialize "VoronoiCells" as an empty dictionary and add a flag "voronoi_mode = False" to tell us whether we want to display the cells or not.
voronoi_mode = False
VoronoiCells = {}
Then inside the Event Loop, we go to where we checked for "KEYDOWN" and add a conditional statement if "SPACE" is clicked. This will flip the flag "voronoi_mode" and if that is now True, we go ahead and generate our VoronoiCells.
if event.type == pygame.KEYDOWN:
     ...
     if event.key == pygame.K_SPACE:
          voronoi_mode = not voronoi_mode
          if voronoi_mode:
               bg_set = [(a,b) for a in range(sw) for b in range(sh)]
               VoronoiCells = Voronoi(bg_set,def_set)
Back in our Main Loop, we go to the loop drawing the defining points and add a check to see if we're in "voronoi_mode". If so, we loop through each cell and color it appropriately.
for defpt in def_set:
     if voronoi_mode:
          ind = def_set.index(defpt)
          for px in VoronoiCells[defpt]:
               screen.set_at(px,colors[ind])
     pygame.draw.circle(screen,(0,0,0),defpt,3)
Now the last thing to do is define the set "colors". I want to do this automatically as well, so we'll take the number of defining points, generate that many colors as distinctly as possible, and then use that as "colors".
We'll define a function for this called "rainbow(n)". If we choose some X between 0 and 255, then the 7 colors
(X,0,0), (0,X,0), (0,0,X), (X,X,0), (X,0,X), (0,X,X), (X,X,X)
all are fairly distinct visually. If we do the same with Y, then all 14 of these colors will be fairly distinct as long as Y is very different from X. So what we'll do is take our number of defining points, divide it by 7 and round up, then use that many evenly spaced points between 0 and 255 to form our colors. For example, if we wanted 40 colors, then we'd need ceil(40/7) = 6 values of X. Since 255/6 = 42.5, we will choose X = 42, 84, 126, 168, 210, 252.
It's also important that this will always return at least as many colors as we want. It may return a few more, but that doesn't matter. Here's how that function looks:
def rainbow(n):
     colors = []
     numX = math.ceil(n/7)
     step = math.floor(255/numX)
     for X in range(step,256,step):
          colors.extend([(X,0,0),(0,X,0),(0,0,X),(X,X,0),(X,0,X),(0,X,X),(X,X,X)])
     return colors
We use "math.ceil" and "math.floor" to round up or down our number respectively. Then we use the list operation "extend" to add those 7 color values to our list of colors. Also notice the "range(step,256,step)" means that we start at "step", then increase by "step" each time, up to and including 255.
Now to incorporate this, we initialize it with "colors = []" above our Main Loop like we have with the others. Then inside the Event Loop, we generate this set of colors at the same time we generate the Voronoi Cells with "colors = rainbow(len(def_set))". We'll also add "colors = []" and "voronoi_mode = False" to the part where we clear "def_set" if "c" is clicked so that we clear our color set and turn off voronoi_mode as well.
With this all put together, let's test it!

It looks really good! Let's do a few examples within the same GIF. Remember we click "c" to clear the screen between each example.

Now we do have a few issues. If we click the screen while in "voronoi_mode", we get a "KeyError" because we look for the Voronoi Cell of a defining point that we didn't have when we calculated the set of Voronoi Cells. But what I'd want to happen is that the screen updates to include that point as a defining point automatically.
To fix that, we just need to add a line that recalculates the Voronoi Cells after the user has clicked with their mouse to add a defining point. But we'll only do this if we're already in voronoi_mode.
...
     if event.type == pygame.MOUSEBUTTONDOWN:
         def_set.append(pygame.mouse.get_pos())
         if voronoi_mode:
             bg_set = [(a,b) for a in range(sw) for b in range(sh)]
             VoronoiCells = Voronoi(bg_set,def_set)
             colors = rainbow(len(def_set))
It looks really good! But there is that weird flip of colors that occurs after we go from 7 to 8 points. To fix that, we take "colors" and reverse it with "colors.reverse()". Here is what adding points to the Voronoi Diagram looks like now:

Awesome! And we accomplished all this in 75 lines of code:
import pygame,sys,math
pygame.init()

def distance(A,B):
     return ((A[0] - B[0])**2 + (A[1] - B[1])**2)**(1/2)

def Voronoi(bg_set,def_set):
     VoronoiCells = {defpt: [] for defpt in def_set}
     for pt in bg_set:
          best = 0
          best_d = distance(pt,def_set[0])
          for i, defpt in enumerate(def_set):
               new_d = distance(pt,defpt)
               if new_d < best_d:
                    best = i
                    best_d = new_d
          VoronoiCells[def_set[best]].append(pt)
     return VoronoiCells

def rainbow(n):
     colors = []
     numX = math.ceil(n/7)
     step = math.floor(255/numX)
     for X in range(step,256,step):
          colors.extend([(X,0,0),(0,X,0),(0,0,X),(X,X,0),(X,0,X),(0,X,X),(X,X,X)])
     return colors

def main():
     sw,sh = 500,500
     screen = pygame.display.set_mode((sw,sh),pygame.RESIZABLE)
     pygame.display.set_caption('Interactive Voronoi')

     voronoi_mode = False
     VoronoiCells = {}
     colors = []
     def_set = []
     while True:
          event_list = pygame.event.get()
          for event in event_list:
               if event.type == pygame.QUIT:
                    pygame.quit()
                    sys.exit()
               if event.type == pygame.VIDEORESIZE:
                    sw,sh = screen.get_size()
               if event.type == pygame.MOUSEBUTTONDOWN:
                    def_set.append(pygame.mouse.get_pos())
                    if voronoi_mode:
                         bg_set = [(a,b) for a in range(sw) for b in range(sh)]
                         VoronoiCells = Voronoi(bg_set,def_set)
                         colors = rainbow(len(def_set))
                         colors.reverse()
               if event.type == pygame.KEYDOWN:
                    if event.key == pygame.K_c:
                         def_set = []
                         colors = []
                         voronoi_mode = False
                    if event.key == pygame.K_SPACE:
                         voronoi_mode = not voronoi_mode
                         if voronoi_mode:
                              bg_set = [(a,b) for a in range(sw) for b in range(sh)]
                              colors = rainbow(len(def_set))
                              colors.reverse()
                              VoronoiCells = Voronoi(bg_set,def_set)

          screen.fill((255,255,255))
          for defpt in def_set:
               if voronoi_mode:
                    ind = def_set.index(defpt)
                    for px in VoronoiCells[defpt]:
                         screen.set_at(px,colors[ind])
               pygame.draw.circle(screen,(0,0,0),defpt,3)

          pygame.display.flip()

main()
Here's one last issue which I'll leave to you to solve. If you generate a Voronoi Diagram and then resize the window, the extra space is just left blank. How could we have it autoupdate when resizing the screen?
Thank you for reading!
Jonathan M Gerhard


Comments